View the video that Modesto Bee made with Kristi Gemperle on “How to Make Naturally Dyed Easter Eggs”
Naturally Dyed Easter Eggs – Swiss Style (Updated)
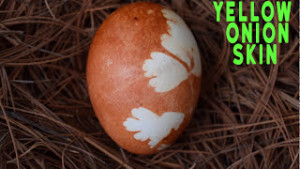
We revamped our last year’s naturally dyed Easter egg recipe to reflect more of the traditional Swiss methods. Onion skins have been used for centuries to make beautiful color …. flowers and leaves help make the design.
Naturally Dyed Easter Eggs (updated)
We revamped our last year’s naturally dyed Easter egg recipe to reflect more of the traditional Swiss methods. We also dyed some eggs raw in the fridge so we had a few to blow out for the “Easter Egg Seed Bomb” activity.
For Visual direction of the Easter egg dying process, view our “How to Make” Photo essay.
All Natural Dye Ingredients
• Hard-boiled eggs. To learn how to make these click here.
• 5 cups of water
• 8 cups loosely packed onion skins (yellow onion skins give an orange hue while red onion skins lend a reddish-brown hue)
• 4 Tablespoons vinegar
Directions:
1. Fill a medium-sized saucepan with 5 cups of water and put over medium-high heat.
2. Add the onion skins and simmer covered for 15 minutes, stirring every couple of minutes.
3. Strain the liquid into a medium-sized bowl.
4. Add the vinegar to the onion skin water.
5. Let cool to room temperature.
6. Add hard-boiled eggs to the onion skin water. Remember that the longer you leave the egg in the solution, the darker it becomes.
At Gemperle Farms, we found 30 minutes works best for most colors. The colors will deepen the longer the eggs soak in the natural dye solution. If you plan to leave your eggs in the solution longer, place them in the refrigerator.
Variations:
Don’t stop with onion skins. Following the directions above, replace onion skins with some of the following all-natural ingredients to create different dyes.
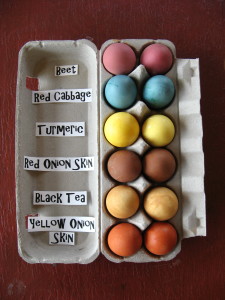
• Yellow: 6 Tablespoons of fresh grated root turmeric
• Blue: 6 cups of chopped purple cabbage
• Pink and red: 4 cups of chopped beets
• Golden brown: 6 Tablespoons of loose black tea or Earl Grey tea
Designing the Eggs
To create a special design on our eggs, we use a simple technique with cheesecloth, leaves, blossoms and grasses collected from our gardens and flat leaf Italian parsley from our fridge. We use onion skins, both white and red, to give the eggs a rich orange color or a reddish brown color.
Items Needed:
• Cheesecloth or pantyhose
• Twist ties or rubber bands
• Variety of natural materials, including plants, leaves, and flowers
• Hardboiled eggs
• Natural dye (directions above)
Directions:
1. Cut a piece of pantyhose or cheesecloth and put a twisty tie on one end.
2. Put a hard-boiled egg in the tied section of cloth and place a mixture of leaves and flowers flat on the egg.
3. Close the other end of the cloth or pantyhose with a twist tie.
4. Place your egg in the prepared dye for about 30 minutes or longer depending on desired color.
We enjoy making this a family with lots of kids and teens in the kitchen!
Naturally Dyed Easter Eggs: A Centuries Old Tradition
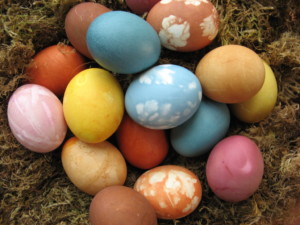
This Easter it’s time to get back to the basics and explore old traditions; forget about all those toxic dyes and chemicals. Why not try a new approach to dying your Easter eggs.Check out our updated version as well.
Naturally Dyed Easter Eggs- A Centuries Old Tradition
Easter is nearing and the time has come to celebrate the centuries old springtime tradition of dying Easter eggs. On our Gemperle egg farm, the Gemperle family takes this task seriously using some of our old family Swiss traditions of preparing natural dyes to color our eggs! We have keen memories of our mother boiling the onion skins, plopping the egg in the solution and eagerly waiting for the color to emerge. In the sixties and seventies we remember a variation of this technique – tie-dyed Easter eggs using old pantyhose and natural items we collected from the garden. It was fun seeing what would emerge after we removed the eggs from the dye solution.
This Easter it’s time to get back to the basics and explore old traditions; forget about all those toxic dyes and chemicals. Why not try a new approach to dying your Easter eggs. All you need are a few ingredients like red cabbage, onion skins, beets and a bit of white vinegar and a keen sense of kitchen exploration.
For more complete Visual direction of the Easter egg dying process, view our “How to Make” Photo essay.
Natural Egg Dye Recipes
Put 5 cups of water in a medium sized sauce pan. Place the ingredient(see options below) for your chosen color in the pan and simmer for 15 minutes. Give the solution a stir every couple of minutes. Strain the liquid into a mug sized container and add two tablespoons of vinegar into the solution; let cool to room temperature. Now you are ready to color your boiled eggs. The longer you leave the egg in the solution the darker it will become. We found that 30 minutes worked well for most colors. If you plan to leave your eggs in the solution longer, place them in the refrigerator. The colors will deepen the longer the eggs soak in the natural dye solution.
Colors
Yellow: Turmeric, 3 tablespoon fresh or dried
Blue: Purple Cabbage, 3 cups chopped
Orange: Yellow Onion skins, 4 cups loosely packed
Brown: Red onion skins, 4 cups loosely packed
Pink and red: Beets, 2 cups chopped
Golden brown: Black tea (Earl Grey), 3 tablespoon loose tea
Swiss Style Easter Eggs
For special designs on our eggs we used a simple tie-dyed technique and a few small leaves, blossoms and grasses collected by the kids from the garden, as well as some flat leaf parsley from the fridge.
Items needed: Cheese cloth or panty hose, twisty ties or rubber band, things collected from your garden
Directions: Cut a piece of pantyhose and put a twisty tie on one end. Put the egg in the pantyhose section and place leaves/flowers on the egg. Now place a tie on the other end. Place your egg in the dye for about 30 minutes or longer depending on desired color. The outcome is always a mystery and two eggs never look the same. Kids love removing the cloth and discovering what’s underneath.
Have fun with your family this Easter creating traditions that the kids will remember for a lifetime. Try making our Gemperle Egg Ranch Braided Swiss Egg Bread . You can even braid in a few of your naturally dyed eggs to make a beautiful , edible Easter centerpiece. Do this by shaping the braid in a circle to resemble a nest. Or create some Easter Egg Seed Bombs the perfect non candy Easter gift to give to those special folks in your life that love flowers and plants.
Egg Seed Bombs: An Easter Craft Idea
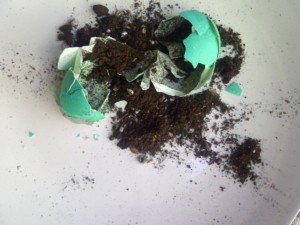
Easter egg seed bombs are the perfect non-candy gift to give to family and friends. They are easy to make and are a fun family craft project. The main idea is to fill a blown out egg with seeds and a filler, then the egg bomb can be thrown on the ground. It explodes and the seeds are scattered and ready to grow.
Easter Egg Seed Bomb
Items Needed:
Eggs (Fresh from the Gemperle Egg Farm are the best!)
Seeds (wildflower mixes or Zinnias are good choices as well as herbs)
Sawdust, compost or peat (acts as a planting medium)
Small funnel (for putting seeds into eggs)
Wooden kabob stick for poking a whole in the eggs/ or metal skewer
A candle (wax used to seal egg)
Colored Sharpies for decorating (or you can use natural dyes to color your eggs before filling)
Step 1. Make the blown out eggs. Poke a hole on each side of longest part of the egg. Push the skewer in and give it a swirl to break up the egg. Now blow in one end of the egg and the inside will come out of the opposite side into a bowl below.
When you have blown out all your eggs, rinse them out thoroughly with warm water, and leave to dry. We suggest waiting overnight to let the inside dry.
Step 2. Seal up the top hole of the egg. Seal the top of the egg with hot wax from a candle. After the wax dries you can scape it smooth.
Step 3. Fill the eggs with seeds and your planting medium. You may need to make your hole slightly bigger. A funnel placed over the hole using your kabob stick to push the seeds and planting medium in works quite well.
Step 4. When you have enough seed mix inside, seal up your hole with wax.
Step 5. Decorate your eggs and remember to label each egg with the variety of seeds inside. Note you can also color your eggs with a natural dye before filling them with seeds.
We used a recycled Gemperle Egg carton and replaced the label with a Happy Easter label and planting instructions to gift our Easter egg seeds bombs. Also check our post on how to dye eggs with natural dyes.
Santa Egg Head Christmas Ornament
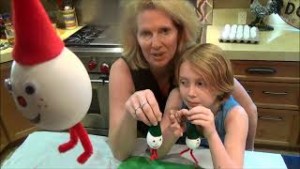
Blown out Gemperle Eggs can be used in fun kids Christmas crafting project. Gemperle kids will join you for a fun afternoon of Christmas crafting! Watch our instructional video and have enjoy crafting.
Egg Head Santa Christmas Ornaments
Halloween Spider Egg Craft
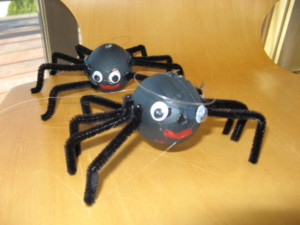
Make these amazing Halloween spiders using the shell of blown out eggs. A fun craft project that will get your kids off the computer.
Halloween Spider Egg Craft
Make these amazing Halloween spiders using the shell of blown out eggs. A fun craft project that will get your kids off the computer.
What you need: Eggs, wiggly eyes (optional), black pipe cleaners, paint and brushes, glue gun, fishing wire for hanging.
Instructions: First you need to blow out the inside of the egg. To do this, make a small hole about the size of a pencil on both top and bottom of the egg. Poke a stick inside the hole and swirl around to break up the egg. Gently blow into one hole and push out the egg on the other side into a bowl.
Next, rinse out the inside of your egg and let it dry.
Now you are ready to decorate your egg. Be creative!!! We painted ours black with a red belly!
Next use your glue gun to glue on the spider legs and wiggly eyes. Glue on the fishing string on the top for hanging. Have fun scaring your friends!
Egg Shell Sprout Heads

These fun egg planters will teach your kids a bit about garden science, as well as provide some sprouts that they can harvest and add to sandwiches or salads. Your kids can give the eggs a haircut and add to their favorite recipes.
Egg Shell Sprout Heads
These fun egg planters will teach your kids a bit about garden science as well as grow some sprouts that they can harvest and add to sandwiches or salads. Your kids can give the eggs a haircut and add to their favorite recipes.
What you need: Extra-large eggs, markers, kids watercolors or paint, cotton balls and/or potting soil, sprout seeds
Instructions: Crack the top of the egg and empty insides into a bowl (save these eggs and use them in one of our egg recipes). Thoroughly wash the egg shells and let them dry. Now have fun decorating the shells with markers or paint. You can make a face or just have fun with creative designs. Put two water soaked cotton balls in each egg shell then sprinkle in your sprout seeds. You can also put some potting soil over the cotton balls for a experiment to test the different growing methods. Place in a warm sunny spot. In about three days you will see your seeds begin to sprout. When the sprout are tall give them a haircut.
Our Findings
After three days our sprouts came up. The egg on the left used only cotton balls. The egg on the right had cotton balls as well as potting soil. We used chia seeds here.
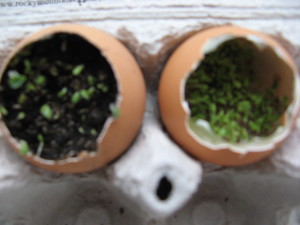
Sprout Heads After 3 Days
After seven days we had some big sprouts. Here the egg on the left has cotton balls only and the egg on the right has both cotton balls and soil.
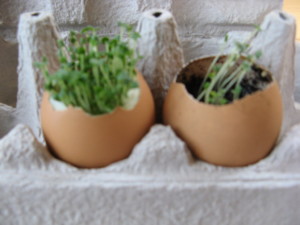
Sprout Heads After 7 Days
Don’t forget to keep your egg heads moist. Let us know how big they grow.


